Battery Not Charging
The battery(s) are charged through three methods; shoreline, solar and the second alternator on the engine.
These steps will guide you through derterming if these three sources are charging. First familiarize yourself with battery monitor, that will provide charge data.

Battery Charging From Shoreline: Step 1
The shoreline charging circuit is interrupted by a shoreline breaker on the lower rear driver side wall panel, check if the breaker is tripped. The breaker has a clear plastic cover over it, push the bottom tab downward and rotate upward to open the housing. A tripped breaker will have the breaker tab in the down position, to reset it simply pull it to the up position. If the breaker is not tripped check for voltage at the shoreline plug. If both have voltage remove the access panel on top of the battery box and probe the incoming voltage to the inverter charger between Incoming Neutral and Incoming Live. If voltage is present please check the inverter display, the portion of the screen shown below in red should read ~120V AC Input and 60Hz.
If this is not the case the inverter could be failed, please contact GMSV for assistance.
Battery Charging From Shoreline: Step 2
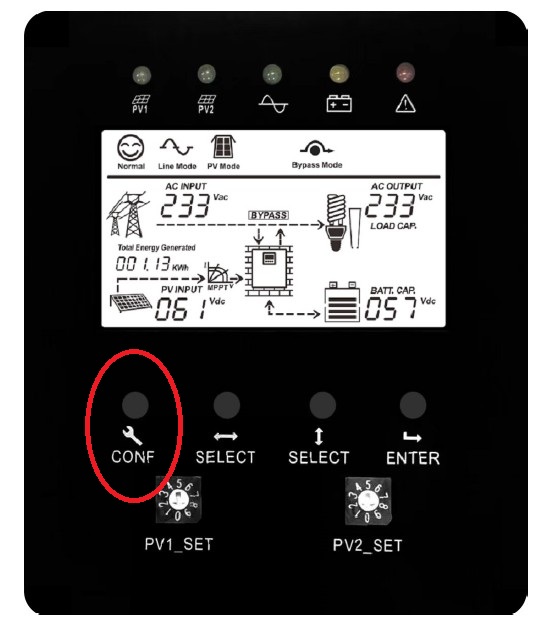
If the voltage is correct please check the inverter settings, hold the “CONF” button until your hear a beep, the screen will change to the settings mode. To move from one setting to the next hold the horizontal “SELECT” button until you hear a beep, the inverter will move to the next setting. Once on the correct setting hold the vertical “SELECT” button until you hear a beep, this will allow you to move to the next setting option. Once all settings are correct hold the “ENTER” button and the inverter will save the settings and go back to the home screen. The top right portion of the screen will display a number pertaining to the setting. Please ensure the settings are as follows:
Setting 7:
Battery shutdown voltage should be set to 20V.
Setting 8-9:
Disregard
Setting 10:
Set battery capacity to 800
If all settings are correct check the charging is enabled in the battery application on your phone. If charging is enabled next replace the MEGA fuse under the black cover in the top right hand of the electronics enclosure. TURN OFF BATTERY VIA THE CUTOFF SWITCH AND REMOVE THE SHORELINE BEFORE PERFORMING THIS OPERATION.
If none of these operations work please contact GMSV for assistance.
Battery Charging From Alternator
Start the van and login to the battery application on your phone and ensure charge and discharge are enabled, press “Clear warnings.”
If the battery is not turned off and shows voltage probe the alternator regulator under the hood and ensure it matches the following voltages:
Primary RED Power Wire (Terminal#3) >24V
Brown Ignition Wire (Terminal #2) 12V or 24V
Primary Blue Field Wire (Terminal #1) 4-22V
If terminal #3 has insufficient voltage it means the inline fuse may be blown or there is a break in the wiring harness leading to the alternator positive terminal.
If terminal #2 has insufficient voltage it means the takeoff fuse in the fusebox may be blown, remove and inspect.
If none of these fix the charging issue please contact GMSV for assistance.